Woocommerce Configurations
ERP to WooCommerce Rest API Integration - Rest API Configuration
Rest API Settings
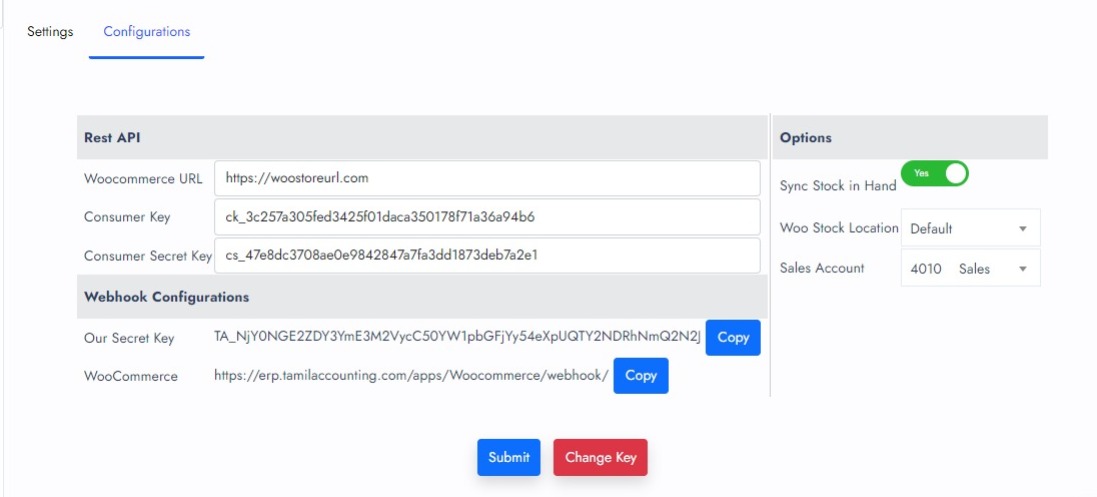
To successfully integrate your ERP with WooCommerce, you need to configure the Rest API settings. These settings establish the necessary communication channels between your ERP system and WooCommerce.
WooCommerce URL
- Description: Enter the URL of your WooCommerce store.
- Example:
https://woostoreurl.com
Consumer Key
- Description: Provide the consumer key for the WooCommerce Rest API. This key is generated in your WooCommerce store's API settings.
- Example:
ck_XXXXXXXXXXXXXXXXXXXXXXXXXXXXXXXXXXXXXXXX
Consumer Secret Key
- Description: Provide the consumer secret key for the WooCommerce Rest API. This key is also generated in your WooCommerce store's API settings.
- Example:
cs_XXXXXXXXXXXXXXXXXXXXXXXXXXXXXXXXXXXXXXXX

Accessing the REST API Settings Page
Log in to WooCommerce Admin
- Open your web browser and log in to your WooCommerce admin dashboard.
Navigate to API Settings
- From the dashboard, go to WooCommerce > Settings.
- Click on the Advanced tab.
Open REST API Settings
- In the Advanced tab, select REST API from the submenu.

Adding a New API Key
Add Key
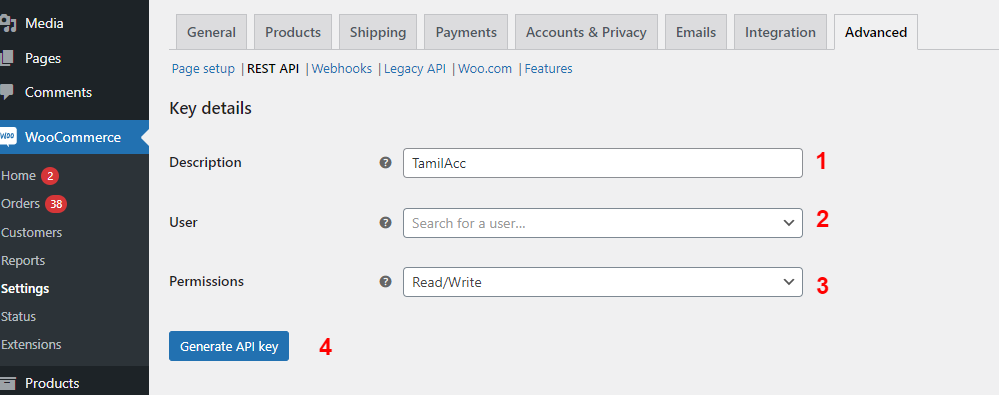
- Click on the Add Key button. This will open a form to create a new API key.
Key Details
- Description: Enter a description for the key (e.g., "ERP Integration").
- User: Select the user account that the key will be associated with. Ensure this user has the necessary permissions to access the required data.
- Permissions: Choose the level of access for this key. Options include:
- Read/Write: Allows both read and write access.
Generate API Key
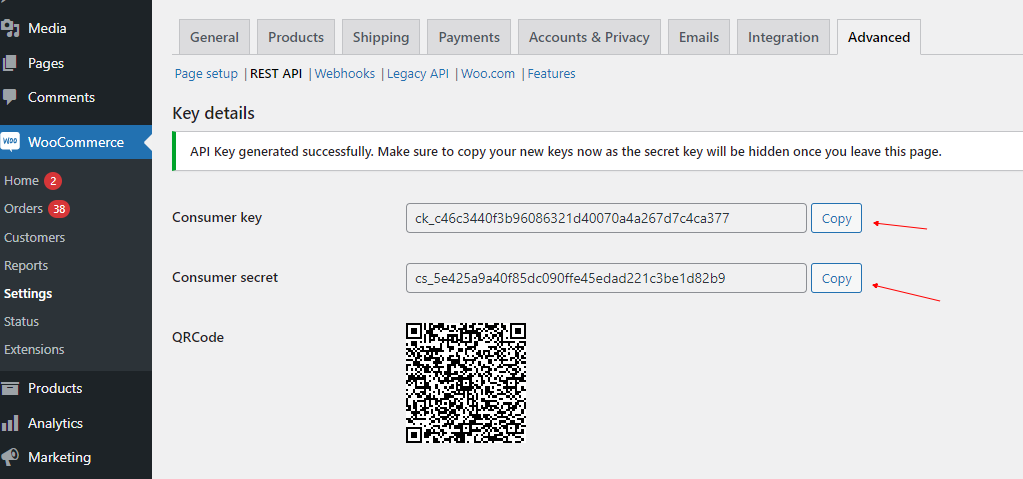
- Click on the Generate API Key button. WooCommerce will generate the Consumer Key and Consumer Secret Key.

Consumer Key and Consumer Secret Key.
Webhook Configurations
Webhook configurations enable real-time data synchronization between your ERP system and WooCommerce. Follow the steps below to set up the necessary webhooks.
Our Secret Key
- Description: This unique secret key is generated by your ERP system to secure the connection with WooCommerce.
- Note: Ensure this key is kept confidential to maintain the security of your integration.
WooCommerce Webhook URL
- Description: This is the Webhook URL provided by your ERP system to establish a connection with WooCommerce.
- Example:
https://erp.tamilaccounting.com/app/Woocommerce/webhook/
Accessing the Webhook Settings Page
Log in to WooCommerce Admin
- Open your web browser and log in to your WooCommerce admin dashboard.
Navigate to Webhook Settings
- From the dashboard, go to WooCommerce > Settings.
- Click on the Advanced tab.
Open Webhooks Section
- In the Advanced tab, select Webhooks from the submenu.

Creating a New Webhook
Add Webhook
- Click on the Add Webhook button. This will open a form to create a new webhook.
Webhook Details
- Name: Enter a name for the webhook (e.g., "ERP Order Created").
- Status: Set the status to Active to enable the webhook.
- Topic: Select the event that will trigger the webhook. Common topics include:
Order createdOrder updatedCustomer createdCustomer updated
- Delivery URL: Enter the URL endpoint in your ERP system that will receive the webhook payload. This URL must be accessible from the internet.
- Secret: Enter a secret key. This key will be used to verify the integrity of the webhook payload.
Save Webhook
- Click on the Save Webhook button to create the webhook.

Options
Configure additional options to fine-tune how data is synchronized between your ERP system and WooCommerce.
Synchronize Stock in Hand
- Description: Enable or disable the synchronization of stock levels from your ERP to WooCommerce.
- Options:
- Yes: Stock quantity changes in your ERP will update in WooCommerce.
- No: Stock quantity changes in your ERP will not affect WooCommerce.
Woo Stock Location
- Description: Specify the inventory stock locations in WooCommerce.
- Example:
Default, Secondary Warehouse
Sales Account
- Description: Define the Sales General Ledger (GL) account used for recording sales transactions from WooCommerce.
- Example:
4010 - Sales
By properly configuring these settings, you can ensure a seamless and secure integration between your ERP system and WooCommerce, leading to efficient and accurate data synchronization for your business operations.


